Micro Fence is great for big projects such as building a desk and just as great for small projects such as installing a door lock. Take a look below for different ways the Micro Fence Edge-Guide System bring precision to your routing.
|
Image
|
How To
|
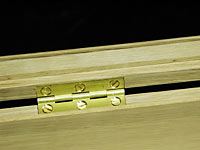 |
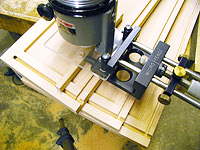
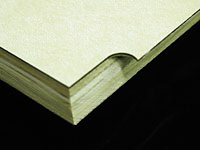
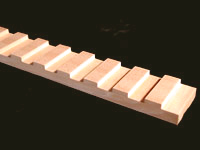
Box Hinges: The Micro Fence can make box hinge installation easy. The Edge-Guide, with either the low or deep-profile wooden fence facing installed can be used for any size hinge mortise. The critical measurement is the hinge leaf dimension. Once checked with dial calipers, this leaf size can be duplicated in the cut made with your router. Make a test cut in scrap material, measure it and dial the difference to match the leaf size precisely. The depth and width of cut can be checked with the back end of the calipers. Square cornered hinges as pictured here require the corners of the mortise to be cleaned out with a well-sharpened paring or corner chisel to remove the radius left by the router bit. |
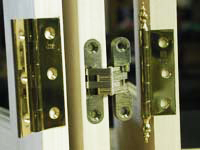 |
Door Hinges: The Micro Fence Edge-Guide will make your set-ups for door hinge installations a simple two-cut procedure. Measure one initial test cut made in scrap material and using your Edge Guide’s micrometer dial, adjust to the same dimension as the leaf of the hinge you wish to install. The set-up is ready to go. In the case of “invisible” hinges (like Soss), it is critical to center them in the edge of the door frame. In a spare piece of door stock, one approximate center placement and test cut will reveal how far to adjust with the micrometer dial. |
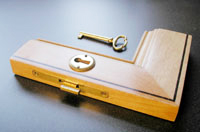 |
Door Locks: Use the Micro Fence Edge-Guide to install drawer and/or door locks. The basic Edge Guide fitted with the deep profile wooden fence provides easy and repeatable settings for this frequently fussy procedure. Usually, the trick with locks and strike plates is to place the mortise on the centerline,(or a specific distance from the edge), of the material you are installing them in. Again, one test cut at the approximate centerline distance will give you a starting point. Use your calipers to measure the material left on either side of the test cut and dial one-half the difference between them…your cut will be dead center. |
 |
Drawer Construction: The basic edge guide can be used effectively to create the dadoes for drawer sides and bottoms. Standard quarter-inch plywood commonly used for drawer bottoms is seldom, if ever, a full 1/4′ thick. Using a 3/16″ bit for a first plough and then adjusting the Micro Fence dial the appropriate amount, (plus clearance), for a second pass, a perfectly-sized dado is easy to accomplish. (We recommend about .010″ for clearance). The Micro Fence can be used in the same manner to create the mortise (or sliding dovetail) cuts for drawer sides. Note: Todays ball-bearing drawer slides (Accuride, KV, Blum, etc.) require that your drawer dimension be +nothing, -1/32″ smaller than the casework opening that it will be installed in. Our micrometer dial makes this tolerance extremely easy to accomplish with a minimum amount of set-up time and without the usual frustrations in setting cuts this accurately. |
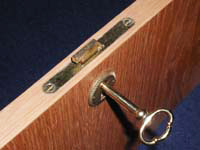 |
Drawer Locks: Mortises required for hinge or lock installations are easily centered by using the basic Micro Fence Edge Guide fitted with one of the straight-line wood fences that come with every unit. One initial ‘test’ cut at approximate center will provide the information to determine the adjustment necessary to center the cut ‘dead-on’. Whatever the difference is between the dimensions left on either side of the ‘test’ cut can be divided by two to determine the adjustment to be made on the micrometer dial. The installation of mortised lock sets, strike plates and invisible (Soss and the like) hinges are significantly simpler with this equipment. |
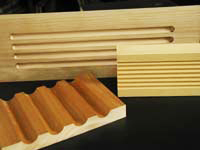 |
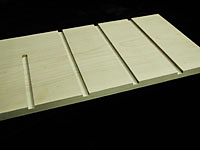
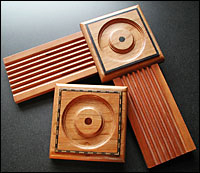
Flutes & Reeds: The Micro Fence Edge-Guide, together with our Stop Collar Set, can make fluting and reeding operations which require equally spaced cuts a very simple operation Odd-numbered groupings require an initial cut to be placed at the center of the workpiece…an initial test cut in same-sized material will indicate how far to adjust the dial to achieve precise centering. For even-numbered groupings simple addition of cut and distance between cuts will dictate how far to set stops for a second position cut. This procedure can be repeated as required by the number of flutes or reeds desired. |
|
|
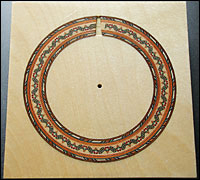
Guitar Rosettes: Our Rosette Cutter was designed specifically to meet the luthiers’ demanding needs for installing guitar rosettes. It offers thousandth-of-an-inch control for circle diameter and depth-of-cut requirements and makes short work of the inconsistent dimensions found in ready-made (or shop-made) inlays. Learn more on our Circle Jig pages. |
 |
Inlays: Whether you make your own inlays or purchase ready made products, the issue of precise and efficient installation can be a source of considerable frustration. The second cut can be made after dialing the difference between the inlay dimension and the size of the first cut. (Be sure to include .002-.003″ clearance when making your final adjustment.) |
 |
Laminate Trimming: The Micro Fence Edge-Guide can be used to conduct flush-trim operations such as those required in Formica or other plastic laminate work. The micrometer adjustment makes it easy to find the setting that minimizes clean-up filing and avoids undercutting. |
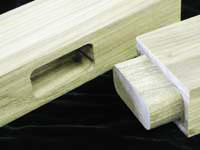 |
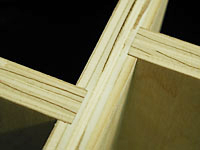
Mortise & Tenon Joinery: There are a number of mortise and tenon styles that are commonly used in furniture building to provide strength to glue joints. Blind mortises, through mortises, and integral or loose tenon joints have traditionally been cut and/or chiseled for centuries to add strength and integrity to a wide variety of furniture and cabinetry assemblies. The advent of the router has created the possibility of approaches to these joints that makes them less tedious to accomplish.
The Micro Fence Edge Guide brings precise control that can facilitate this joint to be cut to whatever tolerance is preferred. One common technique is to cut the tenon on the table saw and then match the mortise to it with allowance for expansion or contraction, (which is dictated by the species of material involved). We find a target of a mortise roughly .010″ larger than the tenon is a good starting point in most medium/hardwoods. (Video coming soon) |
 |
Parallel Dadoes: Our Circle Jig comes with an aluminum sub-fence that mounts to the bottom of either trammel bar (front or rear). The Circle Jig works above the surface of the work allowing the aluminum fence to reach down into a previous cut for referencing parallel cuts. This configuration is useful for bookcase shelving, drawer dividers, audio storage cabinetry, sliding door channels, dentil moldings, or any application where parallel dadoes are needed. |
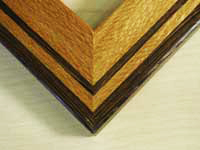 |
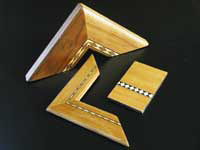
Picture Frames: The Micro Fence Edge-Guide offers some major advantages in the fabrication of picture frames. Edge treatments, inlays and glass rabbets can be made to fit very specific dimensional requirements. Regardless of the size of the inlay or the thickness of glass and backing material, the cuts required can be ‘dialed in’ to the most demanding tolerances. Our Circle Jig can make circular frames within the range of 6″-48″, (and up to 12′ diameter), with the same measured quality as the Edge Guide. Our Center Bar & Leveler Kits, when used with the basic Edge Guide can produce circles down to as small as 1/2″ and up to about 12″. |
 |
Plinth Blocks: The Micro Fence Edge Guide, fitted with the Center Bar & Leveler accessory is capable of cutting circles from approximately 1/2″ to 12″ in diameter. Though not intended to be a production-type technique, the task can be accomplished nicely for ‘one-off’ requirements to avoid a costly plinth cutter costs and to allow custom designs limited only by the inventory of router bits you possess. In cases where the block is of smaller dimension, building a jig large enough to support the swing of the levelers can be constructed from shop materials (melamine, plywood, etc.), leaving a cavity matching the dimension(s) of the block you wish to cut with the surface of the block resting flush to the top of the jig. The plinth block with pilot hole pre-drilled at center is then inserted to cut the rosette detail. |
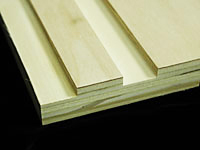 |
Rabbets & Dadoes: The Micro Fence Edge-Guide will allow you to cut dadoes and rabbets of any dimension to accommodate today’s off-size plywoods. By using a bit that’s slightly smaller than the target dimension, you can make one initial cut, measure it with calipers and then use the Micro Fence to adjust to the finished size plus glue clearance (generally .005″ to .010″). Either the size or position of dadoes and rabbets can be efficiently accomplished with this method. |
 |
Shelving Dadoes: Both the Micro Fence Edge Guide and the Circle Jig can be used to accurately size dadoes for shelving components. The Edge Guide, using our simple two-cut approach can create any size dado with appropriate glue clearance (usually .005′ to .010′). Our Circle Jig can cut repetitively spaced dadoes by referencing from a previous cut (see parallel dadoes). |
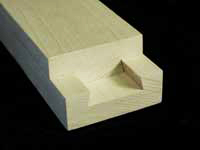 |
Sliding Dovetails: One of the strongest suits of the Micro Fence Edge-Guide System is the ability to make any size cut and then add whatever clearance is required for maximum assembly efficiency and/or fit. Sliding dovetails are easily sized to provide optimized ‘slip-fit’ relationship. Clearances can range from .010″ to as much as .030″ in applications such as drawer or table slides. |
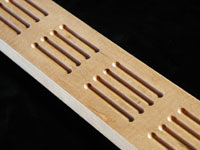 |
Flutes & Reeds: The Micro Fence Edge-Guide, together with our Stop Collar Set, can make fluting and reeding operations which require equally spaced cuts a very simple operation Odd-numbered groupings require an initial cut to be placed at the center of the workpiece…an initial test cut in same-sized material will indicate how far to adjust the dial to achieve precise centering. For even-numbered groupings simple addition of cut and distance between cuts will dictate how far to set stops for a second position cut. This procedure can be repeated as required by the number of flutes or reeds desired. |
| Circle Jig | |
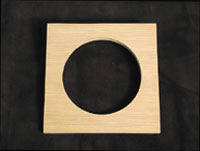 |
See our video on Speaker Cut-outs. |
 |
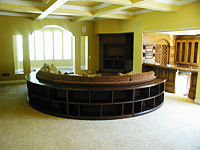
Cutting Circles, rings and arcs is one of the strongest suits of the Micro Fence System. The micrometer adjustment it provides allows not only accurate sizing, but easily- achieved mating of circular parts. Not only can the circles themselves be cut, but inside or outside diameter templates can be made. There are several options for securing the center pin: a 1/8″ pilot hole may be drilled; in some instances, the work may be turned over to swing the circle from the bottom side (the center pin is designed with a sharp spike measuring 3/8″ long); a temporary wood plate can be fastened to the work surface where the pilot hole can be drilled (held down by two-sided tape or temporary glue spots; or our Vacuum Center may be employed.The Circle Jig itself can adjust in telescoping fashion to cut circles from approximately 6″ to 48″ as it comes from our factory. Longer rods (guide shafts), may be added for diameters up to 12 feet. |
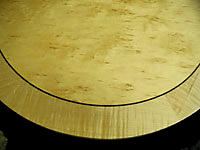 |
Consider the common project of constructing a table-top with a figured plywood center field and a hardwood surround. The center field can be cut to whatever dimension you prefer by setting and locking down the radius required on our Circle Jig Once that cut is completed, the set-up to cut the surround (or segments thereof), can be dialed inboard to position the router bit exactly it’s own cutting diameter closer to the center pin. (This is determined by measuring the kerf of the bit as it makes it’s cut). |
 |
More on Dentil Mouldings coming soon. |
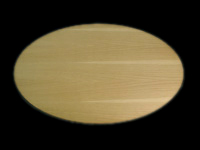 |
More on Elliptical Table Tops coming soon. |
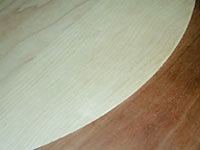 |
More on Mating Radiuses coming soon. |
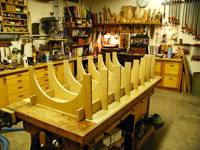 |
More about Bending Forms coming soon. |
 |
See more on our ‘Customer Solutions‘ Gallery. |